
Test Tube Setup for Queen Ants
A simple, low-stress founding setup for newly caught queen ants — with water, cotton, darkness and patience.
If you have caught a queen ant, the first job is not buying a huge nest. It is giving her a calm, humid, secure founding chamber. For many Australian queens, a basic test tube setup is the safest and easiest way to start.
This guide shows the practical setup: what to use, how much water to add, how to pack the cotton, where to keep the queen, and what mistakes to avoid.
Quick answer: the best test tube setup
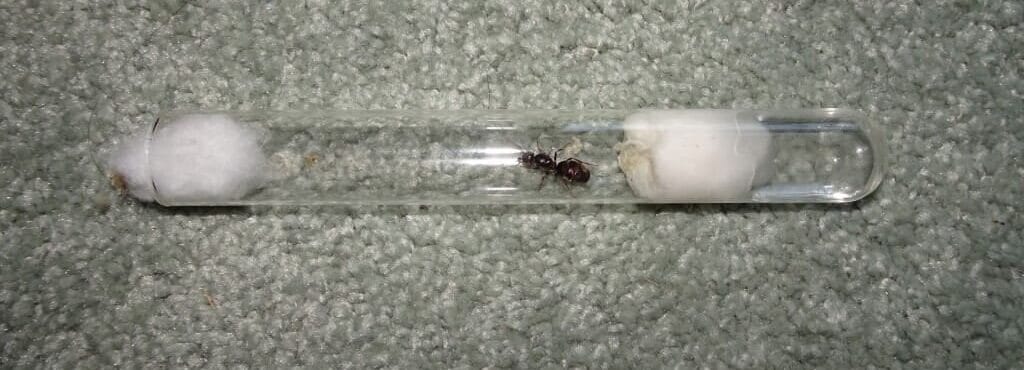
Fill roughly one third to one half of a clean test tube with water, push in a firm cotton plug so the queen cannot touch open water, leave a dry chamber for the queen, then close the opening with breathable cotton. Keep the tube dark, stable and away from direct sun.
What you need
- clean glass test tubes
- plain cotton wool or dental cotton rolls
- clean water
- a pipette, syringe or careful pouring method
- foil, paper or a sleeve to keep the tube dark
- labels for date, location and likely species
- a small container or rack so tubes cannot roll
For a broader starter list, use the Ant Keeping Gear Checklist for Beginners.
Step-by-step setup
- Wash or rinse the tube if needed and let it dry.
- Add water to roughly one third to one half of the tube.
- Push cotton down until it contacts the water and forms a firm wet plug.
- Check there is no open water in the queen chamber.
- Add the queen gently.
- Close the open end with a dry cotton plug.
- Cover the tube and place it somewhere dark and stable.
Tube size and water guide
| Queen / colony stage | Tube size | Water amount | Notes |
|---|---|---|---|
| Small queen | Standard small test tube | About one third | Leave enough dry chamber so she is not cramped. |
| Medium queen | 16–20 mm diameter works well | One third to one half | Good all-round beginner size. |
| Large queen | Larger diameter tube | One third to one half | Make sure she can turn around comfortably. |
| Queen with first workers | Same tube if still clean and hydrated | Keep reservoir stable | Add tiny food portions carefully when appropriate. |
How tight should the cotton be?
The wet cotton plug should be firm enough that water cannot leak into the queen chamber, but not so compressed that no moisture can pass through. The dry end plug should hold the queen securely while still allowing airflow.
- If water leaks through, the plug is too loose or uneven.
- If the cotton is rock hard and dry at the queen side, it may be too compressed.
- If the queen can pull cotton fibres apart easily, use a firmer plug.
- If mould starts spreading fast, prepare a fresh tube and transfer carefully.
Where to keep the queen
- dark or mostly covered
- stable room temperature
- away from direct sun
- away from vibration, speakers and constant handling
- somewhere the tube cannot roll, fall or overheat
Do not put a test tube in direct sunlight. It can overheat quickly and kill the queen.
Should you feed the queen?
It depends on the species. Fully claustral queens often raise their first workers using stored body reserves and usually do not need food during founding. Semi-claustral queens may need small, careful feeding.
If you are not sure what you caught, identify the queen before feeding. Too much food in a sealed tube can cause mould and stress.
- Fully claustral: usually leave alone until first workers.
- Semi-claustral: may need a tiny feeding area or outworld.
- Bull ants / some Myrmecia: not ideal beginner queens; research carefully.
For species choice, see Best Beginner Ant Species in Australia. For late-season bull ant context, see Late-Season Queen Hunting & Bull Ant Flights.
Common test tube setup mistakes
- too much open water in the queen chamber
- cotton plug too loose, causing flooding
- checking the queen every few hours
- feeding too much before workers arrive
- moving the queen into a large nest too early
- keeping the tube in direct sun or a hot car
- using dirty tubes, perfumed cotton or contaminated food
For more beginner traps, read 10 Beginner Ant Keeping Mistakes.
When to move to a new tube
Move only when there is a good reason. A little discolouration is not always a crisis. Move the queen if the tube dries out, floods, grows serious mould, becomes unsafe, or the colony genuinely needs more space.
Use the Moving a Queen Ant to a New Test Tube guide if a transfer is needed.
When to move to a formicarium
Do not rush this. Most beginner colonies should stay in a test tube longer than new keepers expect. A large nest too early can make feeding harder, increase waste issues and stress the colony.
- Wait until there are enough workers to use the space.
- Make sure feeding and hydration are stable.
- Choose a nest suited to the species and colony size.
- Keep escape prevention ready before connecting an outworld.
See Formicarium Upgrade Guide and Ant Nests 101 before upgrading.
FAQ: queen ant test tube setups
How long can a queen ant stay in a test tube?
Often for months, depending on species, water level, mould, worker count and colony behaviour. Many colonies are safer staying in a test tube until they clearly need more space.
Is mould always dangerous?
Small amounts are common and not always urgent. Fast-spreading mould, foul smells, dead insects or wet contamination are stronger reasons to prepare a clean tube.
Should I keep the tube dark?
Yes. Darkness reduces stress for most founding queens. Cover the tube and check only occasionally.
Can I use a plastic test tube?
Plastic can work short-term, but glass is usually clearer, easier to clean and better for long-term founding setups.
Bottom line
A good test tube setup is simple: clean water, firm cotton, a safe queen chamber, darkness and patience. Do not overcomplicate the founding stage. Most beginner mistakes come from fussing too much, feeding too much or upgrading too early.
Queen ant test tube keyword FAQ
How do you set up a queen ant test tube?
Fill part of a clean test tube with water, plug it firmly with cotton, leave a dry chamber for the queen, then close the entrance with another cotton plug. Keep the tube dark, stable and quiet.
How long can a queen ant stay in a test tube?
A queen can often stay in a test tube through founding and early workers if the water remains clean and the chamber is not overcrowded. Move or connect the tube to an outworld when feeding becomes difficult, the tube dries, mould spreads or workers need more room.
Should a queen ant test tube be dark?
Yes, most founding queens do better with darkness and low disturbance. A foil or paper sleeve is cheap, easy and usually enough.
Why is my queen ant pulling cotton?
Queens may pull cotton because they are stressed, trying to adjust humidity, searching for an exit or reacting to disturbance. Check that the plug is firm, the chamber is not flooded, and the queen is being left alone.
Winter and condensation in test tubes
A founding tube can look different in winter. Cooler rooms may slow the queen, reduce feeding response and increase condensation on the glass. Do not rebuild a safe tube just because the queen is quiet for a few weeks.
- Move only when the tube is drying out, flooding, heavily mouldy near the living chamber, or the cotton has failed.
- Avoid direct sun or full-length heat mats on small tubes.
- Keep a cool retreat if using controlled warmth.
- If brood development pauses, check the queen not laying eggs guide before intervening.
The seasonal routine is covered in Winter Ant Keeping in Australia.
If a founding tube starts fogging heavily, leaking or collecting droplets near the queen and brood, check the ant nest too wet guide before forcing a move.
If the queen is already in a tube and barely moving, use the queen ant not moving troubleshooting guide to check whether the issue is normal founding stillness, cold, dehydration, condensation or mould.
Budget setup? If you are trying to start cheaply, use Ant Keeping on a Budget in Australia before buying a display nest. It shows what to buy first, what to skip, and when to upgrade.
Related guides
- Best Ant Keeping Starter Kit Australia
- Ant Keeping on a Budget in Australia — cheap starter setup without buying the wrong nest first.
If she is not laying eggs
If the tube looks safe but the queen still has no eggs after a few weeks, do not keep disturbing her. Work through the Queen Ant Not Laying Eggs checklist before moving, feeding or heating her.