Ant Colony Growth Stages
A beginner-friendly guide to how colonies grow: queen founding, eggs, larvae, pupae, nanitics, workers, expansion and why patience matters.
Ant colonies do not go from “queen in a tube” to “thriving empire” overnight. Most of the early progress is tiny, slow and easy to ruin by fussing. Understanding the growth stages makes ant keeping calmer — and stops you upgrading a colony just because three workers looked at you funny.
Quick answer
A colony usually grows through founding, eggs, larvae, pupae, first workers/nanitics, worker growth, nest expansion and eventually reproductive maturity. Timelines vary by species, temperature, season and queen condition. Feed and upgrade based on brood and worker numbers, not impatience.
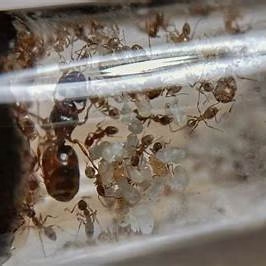
Individual ant life cycle
| Stage | What it looks like | What it needs |
|---|---|---|
| Egg | Tiny white grains | Stable humidity and low disturbance |
| Larva | Small pale grubs | Protein via workers/queen |
| Pupa | Cocoon or naked pupa depending species | Stable conditions |
| Adult | Worker, queen or male | Food, water and colony role |
Colony stage 1: founding queen
The queen is alone or nearly alone. Fully claustral queens usually need darkness and quiet, not feeding. Semi-claustral queens may need safe access to food. This is where beginners need patience most.
Colony stage 2: first brood
Eggs and larvae appear. This is exciting, but it is not a reason to inspect daily. Brood can be hard to see, and queens may move or cluster it depending on moisture and temperature.
Colony stage 3: pupae
Pupae are the final stage before adult workers. Some species spin cocoons; others have naked pupae. Keep conditions stable and resist the urge to “help”. Ants have been doing this longer than we have had tweezers.
Colony stage 4: nanitics
Nanitics are the first workers. They are often smaller and weaker than later workers because the queen raised them from stored reserves. Start tiny sugar and protein feeds once workers are active.
Colony stage 5: early worker growth
Now feeding matters more. Workers forage, care for brood and help the queen raise stronger future generations. Add a small outworld if feeding in the tube becomes messy.
Colony stage 6: established colony
The colony has regular brood, reliable workers and more predictable feeding. This is when a small nest upgrade may make sense, depending on species and worker number.
Colony stage 7: mature colony
Some colonies eventually produce alates — winged queens and males — when large and mature enough. This may take years and depends heavily on species and conditions.
What controls growth speed?
- species
- queen health and mating status
- temperature
- season
- food availability
- brood amount
- stress/disturbance
- nest size and humidity
Common beginner misreads
- No visible eggs yet: may be normal early on.
- First workers are tiny: normal nanitic trait.
- Colony ignores protein: may have little/no larvae.
- Activity slows in winter: may be seasonal.
- Lots of workers at cotton: may mean feeding/space/water needs are changing.
When to upgrade based on growth
Do not upgrade because a timeline says so. Upgrade when feeding becomes awkward, the tube is crowded, water is low, or the colony has enough workers to use more space. A tube plus small outworld is often the best middle step.
Related guides
- What to Do After Catching a Queen
- Ant Feeding Guide
- Formicarium Upgrade Guide
- Moving a Queen to a New Test Tube
- Temperature & Humidity Guide
Sources and further reading checked
- ASU Ask A Biologist — life cycle of an ant colony
- AntKeepers — lifecycle of an ant colony
- Antastic — first year colony development
- Harvard Forest — ant life cycle
Bottom line
Colony growth is slow, staged and species-dependent. Eggs become larvae, larvae need protein, pupae become workers, and first workers are just the beginning. Keep conditions stable, feed to brood demand, and let the colony earn its upgrades.